
Hello everyone,
In this article we are going to describe Port Forwarding also sometimes called Port Mapping, Server access or destination NAT.
What is Port Forwarding?
Port is an application of Network Address Translation (NAT) that redirects a communication request from one address and port number combination to another while the packets are traversing a network gateway, such as a router or firewall.
What does port forwarding do?
Port forwarding allows remote computers (for example, computers on the Internet) to connect to a specific computer or service residing within a private local-area network (LAN) behind a network gateway.
Port Forwarding is commonly used by to grant users on the internet access to servers hosted behind an organizations corporate network.
In most cases a reserved ip address in a private network is assigned to the destination host/server that needs to be accessed from outside the private network (internet) and the Listening port number of the specific application/resource running on the Server is identified,reserved and mapped on the network gateway such as a router or firewall.
The static NAT translations are then mapped and configured on the network gateway. like shown below.
take an example of a Web server running in our internal private network on ip address 192.168.10.5 /24. and we intend to make our webserver accessible on the internet through our public ip address of 105.65.23.49.
our Port Forwarding and Nat static mapping would look like table below:
| Inside Address | Inside Address Listening Port Number | Outside IP address and Port Number |
| 192.168.20.5 | 80 (HTTP) | 202.131.125.148:80 |
| 192.168.20.5 | 443 (HTTPs) | 202.131.125.148:443 |
From the above table, Users on the public internet who want to access the web server running in our internal private network can do so by entering the Outside IP address and Port Combination in their web browsers and our network gateway will redirect / Port forward their traffic to our internal Web server.
In most cases to provide ease of access to clients on the internet, Organization register their Public ip address and map it to a domain like www.ourcompany.com through a domain registrar. By doing this, now users on the internet who want to access our webserver are not required to memorize the Public IP address and Port number in order to access our web server, They can now just type our registered domain of www.ourcompany.com in their web browsers and dns will resolve it to our Public ip address and open our web server.
Configuring Port Forwarding in Ray:
Port Forwarding configuration in Ray is bundled together with IP reservation so you can either stop at IP reservation or in this case enable Port Forward check box in case you want to provide external access to your server or application.
We will also need to define the internal IP address and Internal and external port number to open for the port forwarding.
Lastly we need to create a static Nat entry of our external Public ip address in the same Port forwarding config entry to which we defined our Internal Ip address and Ports..
Step 1 to Step 3:
In Ray controller, we need to click on Profiles--- > IP Reservation / Port Forwarding----->Create IP Reservation / Port Forwarding.
See above steps shown in image below:

On completing steps 1 to Step 3, a pop window will show up from which we shall name our IP Reservation / Port Forwarding Profile. in this article as an example i have named it PORT FORWARD TEST. and select definition as IP Reservation as shown in step 4
Step 4:
See above step shown in image below:

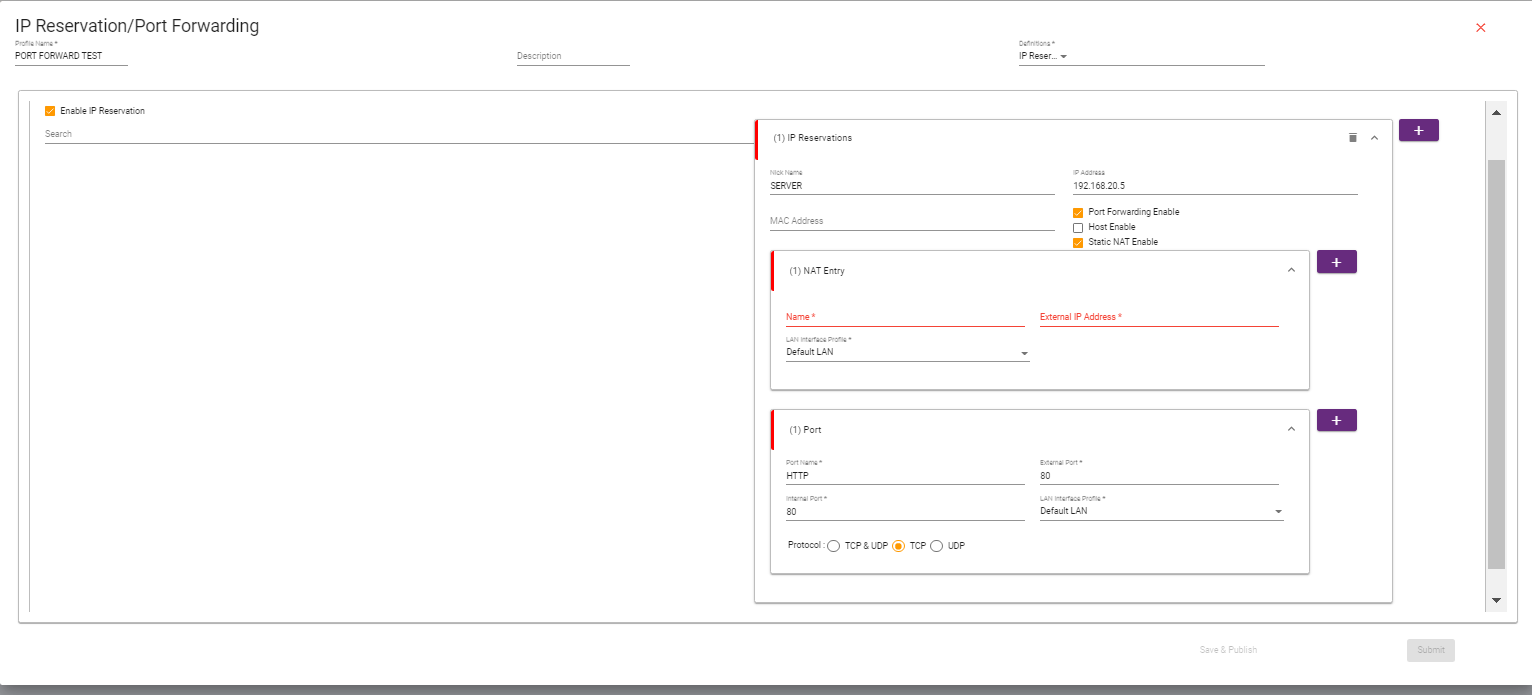
On completing Step 4 by selecting the IP Reservations definition, we shall get an option to enable and input our IP Reservation and Port Forwarding Entries with a menu similar to the one shown in Image below.

Step 5 to Step 7:
Step 5:
At this Point we can now make our First IP Reservation and Port Forwarding Entry.. In this example I named our First entry as SERVER in the Nick name field and used an ip address of 192.168.20.5 (this should be the internally reserved static ip address of the host/server to which you want to port forward traffic to from the External network (internet) to inside the network LAN or DMZ.
In the MAC Address field you can input the corresponding MAC address to the IP address defined.
And importantly, you should enable the Port Forward check box as indicated in image below.
Step 6 and Step 7:
After defining the internal IP address details and enabling Port Forwarding option in step 5,
Assigning name to Port/Service
We now need to define the service / Port name (For well known services/ports such as port 80 for HTTP we can use their names but for custom port numbers, providing a Port name can be useful in identifying the service the ports we input shall be used for.
In our example we used port 80 as our port number and since port 80 is a well known port no. for HTTP we shall name our service/ port HTTP.
☞ Well known Port numbers range from port number: 0 to 1023
List of well known port numbers can be found on this link credit to meridian outpost: Well Port No.s (0-1023) and their services
Step 6:
Internal Port Number
After define the service or port name above, we need to first input the internal port number which should be the actual Port on which our internal Host/Server provided in Step 5 is actually listening to for requests. in our example we decided to input port 80. (This can be seen in image below showing Step 6)
Note: You can map multiple port entries to a single ip address provided the Host has these port opened and is listening on them. and there are no other Hosts in the network listening on the same ports. Step 7:
External Port Number
After providing the internal port number in Step 6. We now need to select the external port number.
The external port number is the port number that the outside devices / clients on the internet are going to try to connect to in order to access our internal resources hosted on the local server. As explained earlier the Internal port number is the actual port open on the local device.
The internal port number and external port number are usually the same, but might be different, depends on what you're trying to accomplish and what the server and client will let you customize.
In some cases some organizations might want to make external port number different than internal port number for security reasons. However in some cases the organization might have to use different external port number due to the port being already in use by another service i.e port 80 might already be in use externally by the firewall as an example.
In our example we shall use Port 80 for both internal and external.
Selecting the Protocol:
After providing the internal and external port numbers in Steps 6 and Step 7, we also need to chose the protocols which the port numbers we have assigned use for communication.
The available options for the protocols include TCP, UDP or Both TCP & UDP. in our example we selected TCP which is the protocol used for HTTP.
However some services /Port numbers such as 161 & 162 which are used by SNMP use both TCP & UDP protocols.
in such a scenario we would be required to select the TCP & UDP radio button in the protocol field. in our Ray IP Reservation / Port Forwarding configuration.
See above Steps 5 to Step 7 illustrated in image below:

Steps 8 to Step 10:
For the final parts of our IP Reservation/Port Forwarding configuration on Ray spanning from Steps 8 to Step 10, We shall look at putting the final piece of the puzzle together, which involves NAT.
So far up to this point in our previous configuration Steps we have mostly configured and defined the Internal Host parameters including the IP address and Port Numbers.
Our next steps will be to configure the External /Public IP address parameters which includes:
Step 8:
Enabling static NAT at Step 8 by clicking on the Static NAT Enable check box.(This step is also shown in image below highlighted as Step 8)
Notice ! on selecting the Static NAT Enable checkbox, a new NAT entry field comes up with options to input our external ip address details and selecting our internal LAN network interface.
See image below showing NAT entry field after completing Step 8 Static NAT Enable:
Step 9:
After completing step 8 above and enabling static NAT,
We need to provide our static public IP address in the External IP Address field shown.. In our example we used Public IP address of 202.131.125.148 in Step 9. (see reference image below highlighting this step).
Step 10:
Our Final step after providing the static NAT public IP address in step 9 which will use a combination of the Public IP address defined in Step 9 and external Port number which we stated in Step 7. Making a NAT entry of (202.131.125.148:80).
If we look at NAT entry table mapping you will see that our traffic will now be forwarded to our internal server listening on internal port 80 on ip address 192.168.20.5
Lastly we need to define the Name of our Static NAT entry, this is an important step as in scenarios where we have to map multiple static NAT entries, it would become nearly impossible to differentiate the NAT entries if we don't name them. In our example we named our static NAT entry as SERVER ACCESS.
See above steps 8 to Step 10 illustrated in Image below:

We have now successfully configured our Port Forwarding configuration on our Ray gateway appliance and users on the external network (internet) should be able to access our internal Server by accessing the HTTP service on our Public IP address.
We hope this article was useful.
Kind regards,
Abdulaziz Musa
Support Lead
Ray Support
