
Ray SD-WAN:
Ray SD-WAN enables use of Software-Based network technologies to virtualize WAN connections to provide agility, performance and reliability for network traffic between remote and branch offices to data centers, cloud and cloud hosted apps.
SD-WAN is a modern-day successor to traditional Site-To-Site VPN and MPLS WAN technologies.
SD-WAN goes beyond traditional VPNs by adding a concept of link redundancy and active quality monitoring through (SLAs).
Ray SD-WAN has the ability of overcoming the limitations that the traditional VPNs would never be able to accomplish especially in topologies such as those of larger corporations with over 100 Branch locations that need to communicate with each other, where making a mesh connection among all the 100 branches would be impossible using traditional VPN and MPLS technology.
However, Ray SD-WAN can overcome such limitations using its orchestrator and co-ordinator hosted on-prem or in the cloud, that makes creating interconnection between an unlimited number of branches with either Hub and Spoke setup Or Mesh Topologies.
With Ray SD-WAN, creating WAN/Site-to-site connections between multiple Branch locations becomes a simple task that can be done in less than 10 minutes. as we are going to demonstrate in this article.
RAY SD-WAN MESH TOPOLOGY REFERENCE DIAGRAM: 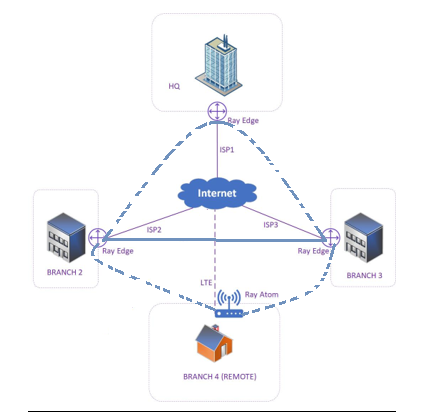
Ray SD-WAN Configuration steps:
STEP 1.
- Click on the SD-WAN menu
- Click on the Network sub menu
- Click on Create network tab.
See the above steps highlighted in the reference image below:

- A pop window will show up requesting for SD-WAN name and CIDR details as shown in image below.
- Kindly fill in the details based on your preference.
!!!*** Important ***!!!

It is important to first ensure that the you are aware of the Local network subnets in use on either ends of the Locations you intend to connect using the SD-WAN Tunnel before you define the SD-WAN CIDR / Network to avoid any IP addressing conflicts that may occur as a result of having 2 identical networks connected.
Define the SD-WAN CIDR / NETWORK:


The 2nd Option indicated below, The coordination server type selected is Cloud and there is no need for a Public IP address for path control and tunnel creation.
The Cloud Co ordination Server Type is the more often preferred method for Networks without a static public ip address available for them to assign to the Ray Edge device.
Note: The other main reason for selecting the Cloud as the SD-WAN co ordination server is ensure stability and continuity since the Cloud is more stable and unlikely to be affected by factors like link congestions as those faced by WAN links with static Public IP addresses
In this article we are going to use the Cloud option as our SD-WAN network Coordination Server.
 After selecting your setup, save and proceed.
You will get a success message saying your network was created.
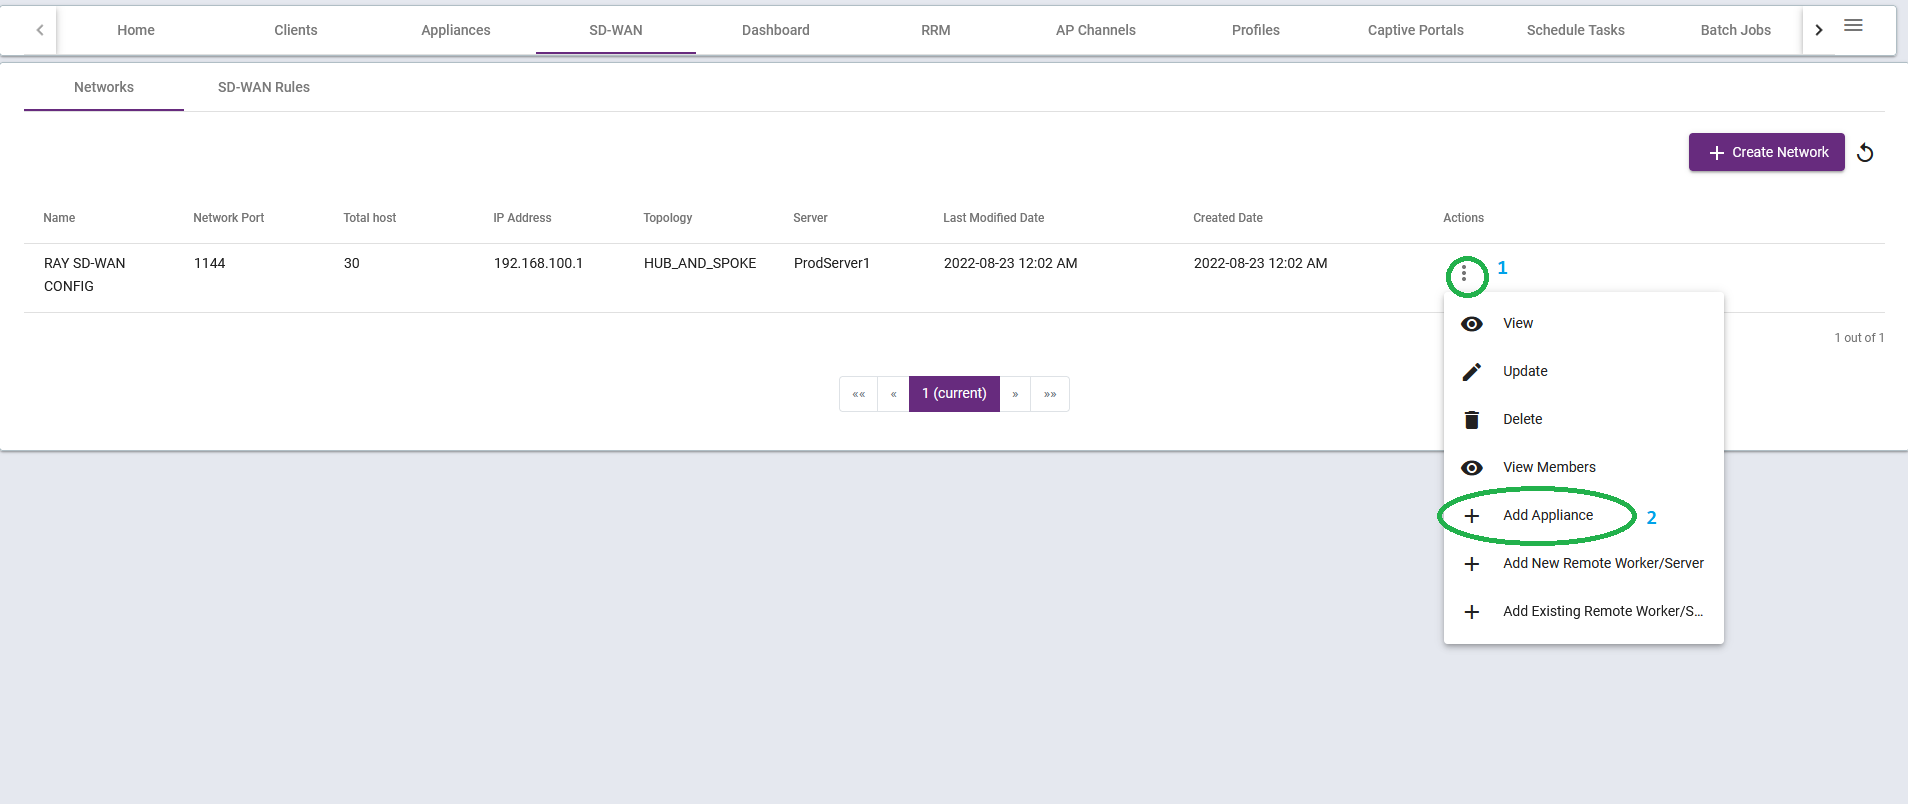
Step 2:
Now to add members (appliances to our SD-WAN network, we click on the actions menu button--> then click on add appliance.)
The above step is highlighted and illustrated in image below:
A pop up window requesting for appliance name and a dropdown search box of where we can locate all the Ray appliances registered under your Ray account.
On the Appliance public ip input field select none, As in this example we are using the Cloud Coordination server and do not to provide a static Public IP address. You will also note these fields are not mandatory as we selected our Coordination server type as cloud..
"Just for Your Knowledge"
In the Case you have a Static Public IP address available for use and you have selected the On Premise Option as the Coordination Server in previous step, Then you can fill this field with your static Public IP address details.
And the last drop down option, requests us to chose the type of Tunnel endpoint the appliance will be. we have option of selecting either HUB or Spoke.
At this stage we shall select Hub as this is a new SD-WAN network and the best practise in creating any Hub and Spoke network topology, the Hub should always be the first point to come up.

since this is our 1st appliance, we shall select Hub. and select next to add our subnets

After selecting Our LAN subnets,
We shall click on next to select the outbound forwarding and select WAN network and save.

after adding the wan network. click on save.
Step 3:
After adding members to our SD-WAN network.
We can now go back to the SD-WAN menu tab---> Networks and click on the actions menu button of our created SD-WAN network to view the members we added to our SD-WAN network.
The above step is highlighted in image depicted below:

From the view members window that comes up, we can see our SD-WAN network members.
In this example we can see the Singapore Ray appliance which we added and selected to be our Hub in the previous step and We can also see the Coordination Server which is hosted in Cloud as we selected in Step 1: of our Configuration.
We also have options to add members to the SD-WAN network following the configuration process we covered in Step 2:
as you can see in the image below.

We hope this article was helpful.
Kind Regards,
Ray Support,
