
SD-WAN HUB DEFAULT ROUTE PROPAGATION:
Hello Everyone,
In this article we are going to be covering the configuration steps of setting up a default route that originates in the sd-wan network from the SD-WAN hub.
This setup is applicable for Hub and Spoke SD-WAN Topologies.
The reference topology and set up will be from our previous article of : Ray SD-WAN Configuration
RAY SD-WAN HUB AND SPOKE TOPOLOGY REFERENCE:

The steps for configuring a default route to be propagated through sd-wan network from the hub is covered in the steps below.
1. From the the cloud controller click on the SD-WAN menu.
2. Click on the Networks sub menu from where we shall see our sd-wan network listed.
3. On our sd-wan network we shall click on the actions menu.
The steps above are highlighted in the image below.

4. On clicking on our sd-wan network's Actions menu in step 3, a pop up box will show up from which we can view the members of our sd-wan network.
The below image helps describes the steps above with highlighted rectangles and numbered steps.

5. On clicking the view members option in the previous step, the members screen will open up listing all the current appliances and users in our sd-wan network.
From the members listed we need to select the member of type listed as hub like highlighted in the images below and click on the actions menu.
6. After clicking the actions menu in step--> 5, a pop box will come up from which we need to click the update option as highlighted in order to add our default route of 0.0.0.0/0
See images below highlighting steps 5 & 6 for your visual reference.

7. From the previous step on clicking update, a pop up screen with configuration options will come up. from which we shall click next when prompted to add appliance as our objective is not to add appliance but rather to add a subnet with default route (0.0.0.0 /0) .
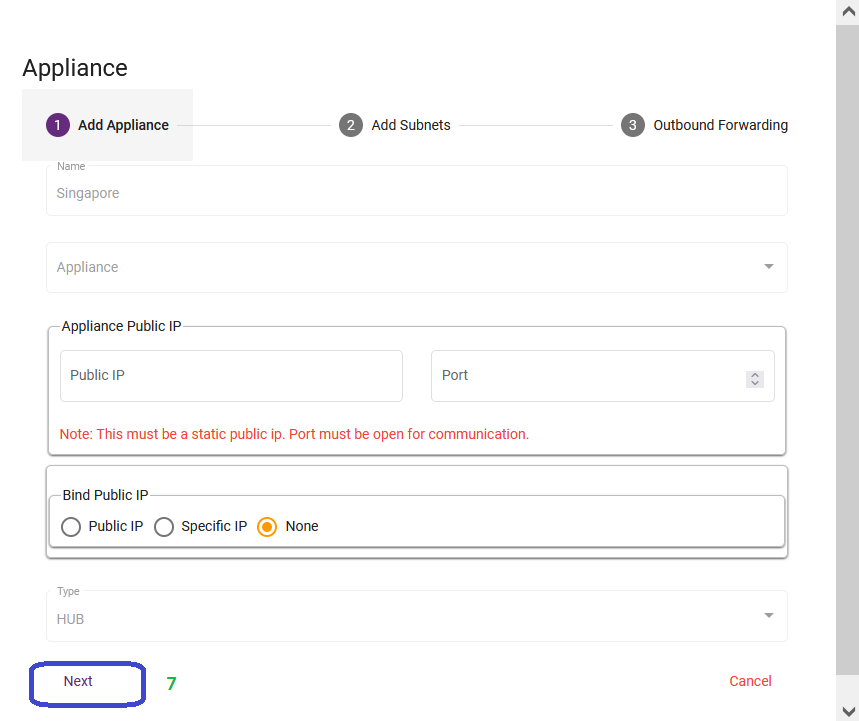
8. On clicking next, the add subnets configuration window will appear which is the main focus of our article.
On this window we shall add 0.0.0.0/0 as our subnet. (Doing this will help us accomplish a full tunnel setup in
our sd-wan network). with the default route for our spokes originating from the hub.
It is also worth noting that we can also include other subnets we may want to make routable over the tunnel when adding the default route 0.0.0.0 /0

9. On clicking next. in the outbound forwarding tab, just click save.

Up to this point in step.9 above, we have successfully added a default route (0.0.0.0/0) in our SD-WAN network that is being propagated to our SD-WAN spokes.
DEFINING TRAFFIC THAT THE DEFAULT ROUTE WE JUST CREATED WILL APPLY TO USING SD-WAN RULES:
10. The next step is to create a sd-wan rule that will apply our default route to the sd-wan tunnel interface of our sd-wan network.
This can be accomplished by clicking on SD-WAN--> SD-WAN rules---> CREATE SD-WAN.
as demonstrated in image below.

12. On the pop screen we shall define the name of our SD-WAN rule. and select definitions as sd-wan rule.
We also need to select the check box of apply this rule to default traffic as highlighted in a circular blue mark in image.
See image below.

13. in the destination addresses field, we need to specify the ip address of the hub. so as the spokes can know to which ip to send their traffic.

14. Lastly we need to select the interfaces for the sd-wan rule by selecting interface profile as tunnel and choosing the Our sd-wan network.
In the Weight Field .setting the Weight(metric) in this example we set the weight as 20
See illustration below;

15. We also want to include the Wan interface as an additional interface for traffic to reach the hub
as shown in image below.

On completing step 15. you have successfully created an SD-WAN Full-Tunnel setup with a default route of (0.0.0.0/0 ) being propagated to the SD-WAN network Spokes.
We hope this article was helpful.
Thanks,
Ray Support
